Using Images and Design Elements with ID Badges Maker for Mac
How ID badge makers typically work and how you can use your own images and design elements:-

-
Choose an ID Badge Maker for Mac: There are several ID badge maker software options available for Mac users. Some popular ones include Adobe Photoshop, Adobe Illustrator, Canva, and Microsoft Word. These tools provide a range of features and functionalities to create professional-looking ID badges.
-
Create a New Project: Launch your chosen ID badge maker software on your Mac and create a new project or document. The exact steps may vary depending on the software you are using. Look for options like "New Document" or "Create New Project."
-
Set Up the Document: Once you have created a new project, you'll need to set up the document with the appropriate dimensions and settings for your ID badges. The standard size for ID badges is typically around 3.375 inches by 2.125 inches (8.57 cm by 5.4 cm), which is similar to the size of a credit card. Adjust the document settings accordingly.
-
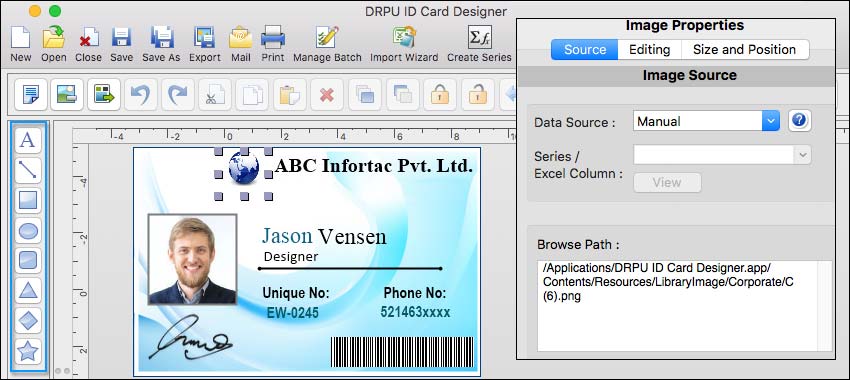
Import Your Images: To use your own images in the ID badge design, you'll need to import them into the software. Look for options like "Import Image" or "Place Image" in the software's menu. Select the image file from your Mac's storage and import it onto your document. Depending on the software, you may be able to resize, crop, or apply other edits to the image within the program.
-
Design Elements: Most ID badge makers provide various tools and features to add design elements to your badges. These can include text, shapes, lines, backgrounds, and other graphical elements. Explore the software's options to access these tools and customize your ID badge design. You can typically change colors, fonts, sizes, and positions of the design elements.
-
Arrange and Position Elements: Arrange the imported images, design elements, and text on your ID badge document to create the desired layout. Most ID badge makers allow you to drag and drop elements, resize them, and align them using guidelines or grids for precision.
-
Save and Export: Once you are satisfied with your ID badge design, save your project to preserve the editable format for future modifications. Additionally, export your final design as an image file (e.g., JPEG, PNG) or a PDF, depending on your intended use. This will allow you to print or share the ID badges digitally.
Import Data from Other Sources to use with ID Badges Maker for Mac
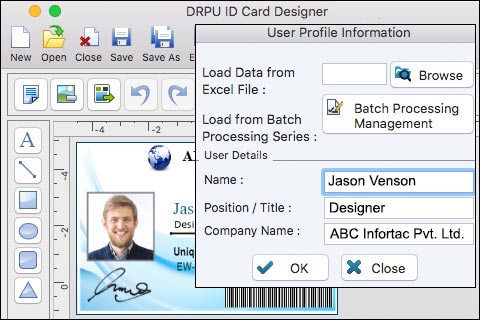
Yes, many ID badge makers for Mac offer the ability to import data from external sources to streamline the process of creating ID badges. This feature allows you to populate the badge designs with information automatically, saving time and ensuring accuracy. Here's a detailed explanation of how you can import data from other sources:

-
Data Source Compatibility:
ID badge makers typically support various data source formats that contain the necessary information for badge creation. These data sources can include spreadsheets (e.g., CSV, XLSX), databases (e.g., Microsoft Access, MySQL), or other common file formats that store structured data.
-
Data Mapping:
Once you have identified the data source you want to import, the ID badge maker provides a data mapping feature. This feature allows you to match the fields in your data source with the corresponding fields on the badge template. For example, you can map the "Name" field from your data source to the "Name" field on the badge template.
-
Importing Data:
After mapping the fields, you can initiate the data import process. The ID badge maker typically provides an option to import data from the chosen source. You may be prompted to select the specific file or database connection from which you want to import the data.
-
Field Matching and Validation:
During the import process, the ID badge maker attempts to match the fields in your data source with the fields on the badge template based on the mapping you defined. It verifies that the data types and formats are compatible. If any inconsistencies or errors are detected, the software may display warnings or prompts to address or correct the issues.
-
Preview and Data Review:
After importing the data, the ID badge maker usually provides a preview of how the information will be populated on the badge design. You can review the imported data, ensuring that it is correctly aligned with the fields on the template. This preview allows you to verify the accuracy of the imported data before proceeding.
-
Editing and Formatting:
Once the data is imported, you can further customize and format the populated fields on the badge design. This may include adjusting the font style, size, and color of the imported text, as well as resizing or repositioning the fields to ensure a visually appealing layout.
-
Batch Printing:
If you are creating ID badges for multiple individuals, the ID badge maker may offer a batch printing feature. This allows you to specify the number of badges you want to print and automatically generates unique badges for each individual based on the imported data.