Create Custom ID Badges with an ID badges Maker for Mac
Yes, you can create custom ID badges with an ID badge maker for Mac. These software applications offer a range of customization options to design badges that meet your specific requirements. Here's a detailed explanation of how you can create custom ID badges using an ID badge maker for Mac:

-
Printing:
Connect a compatible ID card printer to your Mac computer and ensure it is set up correctly.
Load the appropriate badge stock or cards into the printer as per the manufacturer's instructions.
Configure the printing options within the ID badge maker software, such as printer settings, print quantity, and desired print quality.
Initiate the printing process by clicking the "Print" button or selecting the print command.
The ID badge maker will send the customized badge design to the printer, which will then produce the ID badges accordingly.
-
Design Customization:
Once you have chosen a template, you can customize it according to your preferences.
Modify the layout by adding, removing, or rearranging elements on the badge. These elements may include text boxes, image placeholders, logos, shapes, or lines.
Personalize the badge by adding individual information, such as the person's name, photo, job title, department, or any other relevant details.
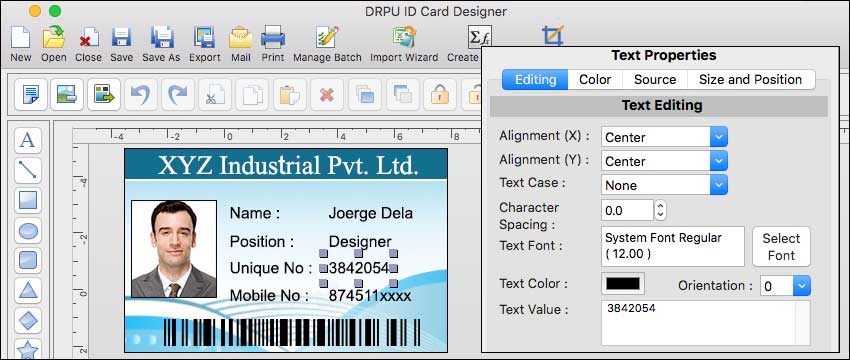
Adjust the font styles, sizes, and colors to match your organization's branding or aesthetic preferences.
Some badge makers provide tools to create custom backgrounds or apply color gradients, textures, or patterns to enhance the visual appeal of the badges.
-
Graphics and Images:
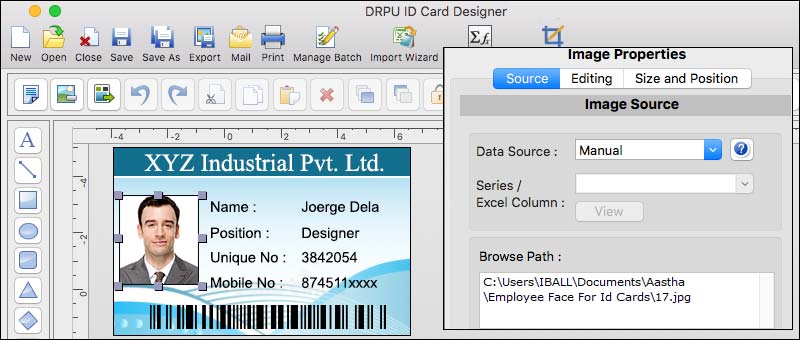
Import and add graphics, such as company logos, icons, or symbols, to the badge design. These can be obtained from your own files or from a built-in library of clipart or vector images provided by the badge maker software.
Incorporate the person's photo onto the badge. You can usually import images from your computer or directly capture photos using a connected camera.
Incorporate the person's photo onto the badge. You can usually import images from your computer or directly capture photos using a connected camera.
-
Template Selection:
When you open the ID badge maker software, you will typically be presented with a selection of pre-designed templates to choose from.
Browse through the available templates and select one that closely matches the style or layout you desire for your ID badges.
Templates often come in different designs, orientations (portrait or landscape), and sizes. Pick the one that best suits your needs.
-
Text and Styling:
Customize the text elements on the badge, including the person's name, title, department, or any other relevant information.
Modify the font styles, sizes, colors, and formatting options (bold, italic, underline) for each text element to achieve the desired look.
Align and position the text boxes within the badge layout, ensuring readability and aesthetic balance.
-
Security Features:
If required, add security features to your custom ID badges to enhance their authenticity and functionality.
Common security features include barcodes, QR codes, magnetic stripes, holographic overlays, or watermarks.
Configure the settings for these security features, such as the type of barcode or QR code format, data encoding, or encryption methods.
-
Preview and Testing:
Before printing, preview the customized badges within the ID badge maker software to ensure they appear as intended.
Review the design, layout, and content to verify accuracy and visual appeal.
Make any necessary adjustments or refinements based on the previewed badges.
-
Post-Printing Tasks:
Once the badges are printed, remove them from the printer and inspect the output for any issues or errors.
If desired, laminate the badges for increased durability and protection against wear and tear.
Separate the badges and distribute them to the intended recipients.
By following these steps, you can create custom ID badges using an ID badge maker for Mac. The level of customization may vary depending on the features and capabilities of the specific badge maker software you choose to utilize.
Download and Install ID Badge Maker for Mac
Import Data from other Sources to use with an ID Badges Maker for Mac
Yes, you can import data from other sources to use with an ID badge maker on Mac but the process may vary depending on the specific ID badge maker software you are using:-
Here's a step-by-step guide on how you can import data into an ID badge maker on Mac:
-
01Identify the data source:
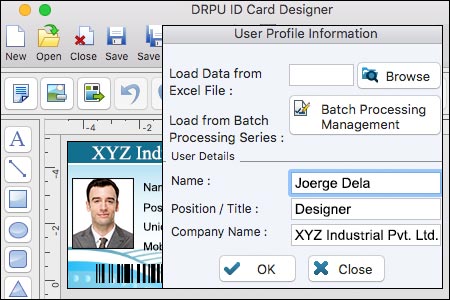
Determine the source of the data you want to import. It could be a spreadsheet, a database, or any other file format that contains the necessary information for your ID badges, such as names, employee IDs, photos, etc.
-
02Prepare your data:
Make sure your data is properly organized and formatted according to the requirements of the ID badge maker software. This may involve arranging the data in columns or fields, ensuring the data types are correct, and cleaning up any inconsistencies or errors in the data.
-
03Export or save your data in a compatible format:
If your data is already in a compatible format that the ID badge maker software can directly import, you can skip this step. Otherwise, you may need to export or save your data in a format that is supported by the badge maker software. Common file formats for data import include CSV (Comma-Separated Values) or Excel spreadsheets (XLS or XLSX).
-
04Open the ID badge maker software:
Launch the ID badge maker software on your Mac. Ensure that you have the latest version of the software installed, as it may offer improved features and compatibility with various data sources.
-
05Locate the import feature:
Look for the import feature within the ID badge maker software. It may be accessible through a menu option like "File" or "Import," or there might be an icon or button specifically designated for importing data.
-
06Select the data source:
Choose the option to import data and navigate to the location where your data file is saved. Select the file and open it.
-
07Map the data fields:
Once the data file is loaded, you'll need to map the data fields in the file to the corresponding fields in the ID badge template. For example, you'll need to specify which column in your data corresponds to the "Name" field on the ID badge template, which column corresponds to the "Employee ID" field, and so on. This step ensures that the data is correctly populated in the badge design.
-
08Preview and verify the data:
After mapping the data fields, the ID badge maker software may provide a preview of how the imported data will appear on the badges. Take this opportunity to review the data and make sure it's accurately displayed. If necessary, make any adjustments or corrections to the mapping.
-
09Import the data:
Once you're satisfied with the data preview, proceed with the data import. The ID badge maker software will import the data from your file and populate the corresponding fields on the ID badge template.
-
10Customize and finalize the badges:
With the imported data, you can now customize the ID badge design further by adding logos, adjusting layouts, choosing fonts, or incorporating other visual elements. Once you're done customizing, save your badges and proceed with the printing or exporting options provided by the ID badge maker software.
Important Note: It's important to note that the specific steps and terminology may vary depending on the ID badge maker software you are using. Therefore, it's recommended to consult the software's documentation or help resources for precise instructions tailored to the particular application you have.
Using Images and Design Elements with an ID Badges Maker for Mac
Yes, you can typically use your own images and design elements with an ID badge maker for Mac. Most ID badge maker software applications allow you to customize the design of your badges by incorporating personal images, logos, and other design elements. Here's a detailed explanation of how you can use your own images and design elements with an ID badge maker:

Remember to refer to the documentation or help resources provided with your specific ID badge maker software for detailed instructions and specific features available within the application