Importing Designs

When importing a design, you're bringing an existing file into your birthday card maker software program. This can be useful if you have a design saved in a different format or if you want to collaborate with someone who has created a design in another program. Here are the steps for importing designs in different birthday card maker software programs:
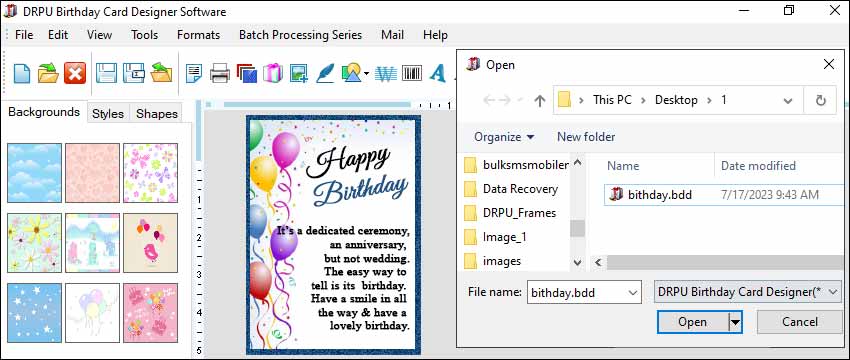
Importing Birthday Card Designs
  • Canva:

    To import a design in Canva, you'll need to click on the "Uploads" tab on the left-hand side of the screen. From there, you can either drag and drop a file into the designated area or click on the "Upload an image or video" button to browse your files.

  • PicMonkey:

    To import a design in PicMonkey, you'll need to click on the "Open" button in the top-left corner of the screen. From there, you can choose to open a file from your computer, Hub, or any integrated cloud storage service.

  • Adobe Spark:

    To import a design in Adobe Spark, you can click on the "Import" button in the top-right corner of the screen. From there, you can choose to import a file from your computer, Dropbox, or Adobe Creative Cloud.

  • Fotor:

    To import a design in Fotor, you can click on the "Import" button in the top-left corner of the window screen. From there, you can choose to import a file from your computer, Facebook, or Dropbox.

Exporting Designs

Exporting a design means that you're saving it in a format that can be used outside of your birthday card maker software program. This can be useful if you need to send the file to a printing service or share it with someone who doesn't have access to the program you used to create it. Here are the steps for exporting designs in different birthday card maker software programs:

  • Canva:

    To export a design in Canva, you'll need to click on the "Download" button in the top-right corner of the screen. From there, you can choose the format you want to save the file in (such as PDF, JPG, or PNG) and adjust the quality settings as needed.

  • Adobe Spark:

    To export a design in Adobe Spark, you can click on the "Download" button in the top-right corner of the screen. From there, you can choose the format you want to save the file in (such as JPG or PNG) and adjust the quality settings as needed.

  • Fotor:

    To export a design in Fotor, you can click on the "Save" button in the top-right corner of the screen. From there, you can choose the format you want to save the file in (such as JPG or PNG) and adjust the quality settings as needed.

  • PicMonkey:

    To export a design in PicMonkey, you'll need to click on the "Export" button in the top-right corner of the screen. From there, you can choose the format you want to save the file in (such as JPG or PNG) and adjust the quality settings as needed.

Tips to Make the Process More Efficient and Seamless

Importing and exporting designs is an essential aspect of using a birthday card maker software. It enables you to work on your designs on different devices and platforms and collaborate with others. Here are some tips to make the process more efficient and seamless:

  • Choose the Right File Format:

    When exporting your designs, choose a file format that is compatible with the software or application you will be using to open the file. Common file formats for exporting designs include PDF, PNG, and JPEG.

  • Check for Bleed Margins:

    If you are exporting a design for print, ensure that you have included the appropriate bleed margins to prevent trimming errors. Most printing services will provide you with their specific bleed requirements.

  • Consider the Resolution:

    Ensure that the resolution of your exported file is high enough to produce high-quality prints. For print designs, a resolution of 300 DPI (dots per inch) is recommended.

  • Name Your Files Appropriately:

    Give your exported files a descriptive and easily recognizable name. This will help you and others identify the file quickly and avoid confusion.

  • Backup Your Files:

    Always make a backup of your design files before exporting them. This ensures that you have a copy of the original design in case of any errors or issues during the exporting process.

  • Test Tour Design:

    Before finalizing your design, print a test copy to check for any issues with color, resolution, or alignment. This ensures that your final print is of high quality and meets your requirements.

  • Use Cloud-based Storage:

    Consider using cloud-based storage such as Google Drive or Dropbox to store your design files. This allows you to access your designs from different devices and platforms and easily share them with others.

  • Check for Compatibility Issues:

    Before importing a design into your birthday card maker software, ensure that the file is compatible with the software. Check the supported file formats and ensure that the design elements, such as images and fonts, are included in the file.

  • Organize Your Files:

    Keep your imported files organized by creating folders and naming them appropriately. This makes it easier to find the files you need and avoid clutter.

  • Check the Alignment and Layout:

    After importing a design, check the alignment and layout to ensure that the design elements are in the right position and there are no overlapping or missing elements.
Test and Validate Your Birthday Card Designs

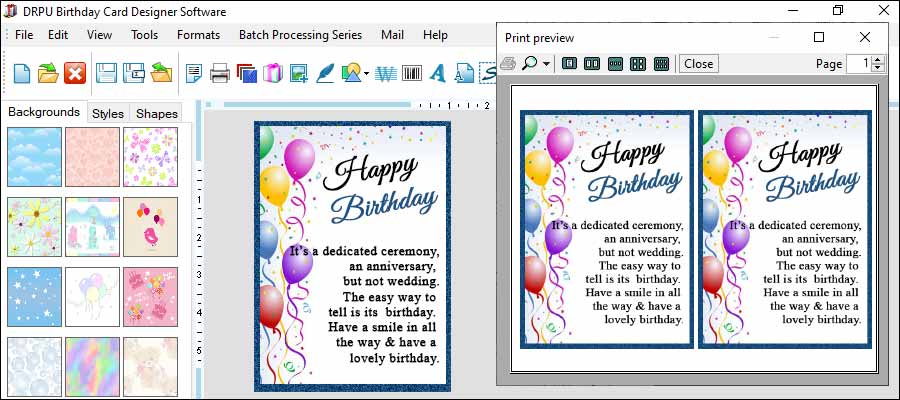
Testing and validating birthday card designs before sending them to print is an important step to ensure that the final product meets the desired quality and specifications. Here are some best practices for testing and validating birthday card designs using birthday card maker software:-

Test and Validate Your Birthday Card Designs
  • Check for errors and inconsistencies:

    Before testing your design, make sure that there are no errors or inconsistencies in your design. Check for typos, alignment issues, and incorrect colors.

  • Preview your design:

    Preview your design on the software to see how it looks on different devices and screen sizes. This will help you ensure that your design is consistent across all devices.

  • Test your design on different browsers:

    Test your design on different web browsers to ensure that it is compatible with all browsers.

  • Print a test copy:

    Print a test copy of your design to check for any errors or issues with the print quality. This will help you identify any issues with the layout, color, or resolution before printing the final copy.

  • Use a color calibration tool:

    Use a color calibration tool to ensure that the colors in your design match the colors in the original image. This will help you ensure that your design is printed with accurate and consistent colors.

  • Check the resolution:

    Check the resolution of your design to ensure that it meets the minimum requirements for printing. If the resolution is too low, your design may appear pixelated or blurry when printed.

  • Check the bleed margins:

    Check the bleed margins to ensure that your design does not have any white spaces or borders when printed. Bleed margins are the areas that extend beyond the edge of the final cut, and they ensure that the printed design goes all the way to the edge of the card.

  • Get feedback:

    Get feedback from other designers or stakeholders to ensure that your design meets their requirements and expectations. This will help you identify any issues or areas for improvement.

By following these best practices, you can ensure that your birthday card designs are thoroughly tested and validated before sending them to print, which can save you time, money, and frustration in the long run.