Types of Data that can I Include on Visitor ID Cards

-
Visitor's Name:
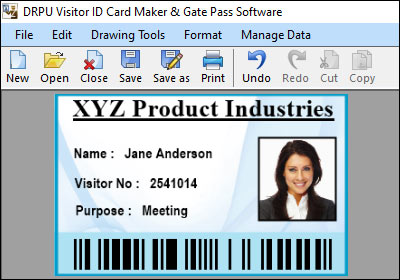
The visitor's full name is typically included on the ID card as the primary identifier. It helps security personnel and staff members address visitors by their names and verify their identities.
-
Visitor's Photograph:
Including a photograph of the visitor on the ID card enhances visual identification. The photograph can be captured at the time of check-in or imported from a file. It serves as a visual reference for staff members to verify the visitor's identity.
-
Visitor's Company or
Affiliation:
If the visitor is representing a specific company or organization, their affiliation can be included on the ID card. This helps in identifying the visitor's purpose or association and assists in networking or communication.
-
Visitor's Role or Purpose:
The ID card can display the visitor's role or purpose for the visit. For example, if the visitor is a contractor, consultant, or delivery person, their specific role can be mentioned. This information helps staff members determine the visitor's access rights or privileges.
-
Expiration Date:
If visitor access is time-limited, the ID card can include an expiration date. This ensures that the visitor's access rights are valid only for a specific duration and prevents unauthorized access after the designated period.
-
Barcode or QR Code:
Including a barcode or QR code on the ID card allows for efficient scanning and retrieval of visitor information. These codes can encode unique identifiers, access permissions, or other relevant data. Scanning the code simplifies check-in, check-out, or access control processes.
-
Access Levels or
Restrictions:
If your organization has different access levels or restricted areas, the ID card can indicate the visitor's authorized access areas. This information can be visually represented through color-coded badges, icons, or text, allowing staff members to quickly determine the visitor's permissions.
-
Emergency Contact
Information:
To ensure the visitor's safety and well-being during emergencies, the ID card can include emergency contact information. This may include a designated contact person, emergency hotline number, or other relevant details.
-
Visitor ID or Badge Number:
Assigning a unique identification or badge number to each visitor facilitates record-keeping and tracking. This number can be displayed on the ID card for easy identification and referencing in visitor logs or databases.
It's important to consider the balance between the amount of information included on the ID card and data privacy concerns. Ensure that you comply with applicable privacy regulations and only include necessary information that aligns with your organization's policies.
Conclusion: By including the appropriate data on visitor ID cards, you can effectively identify visitors, control access to different areas, enhance security, and ensure a smooth visitor management process.
Print Visitor ID Cards in Different Sizes with a Visitor ID Card Maker
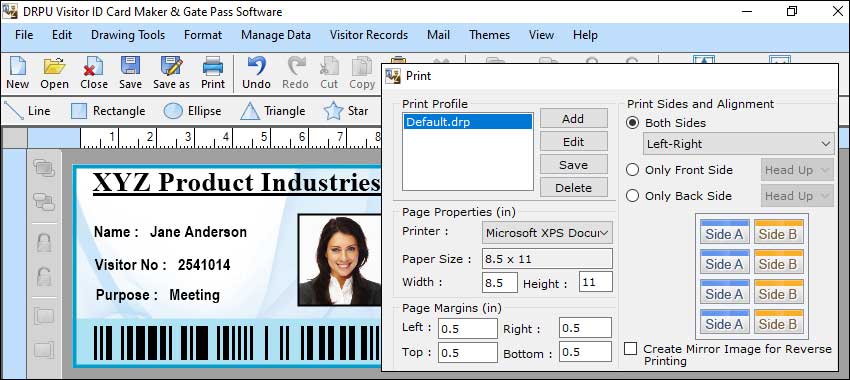
With a visitor ID card maker, you can typically print visitor ID cards in different sizes based on your requirements. The flexibility to choose different card sizes allows you to customize the ID cards to meet specific needs, visual preferences, or compatibility with existing ID card systems. Here's a detailed explanation of how you can print visitor ID cards in different sizes using a visitor ID card maker:
-
Card Size Options:
The ID card maker software provides options for selecting the desired card size. This can include standard sizes such as CR80 (credit card size: 3.375" x 2.125") or CR100 (3.88" x 2.63"), as well as custom sizes based on your organization's preferences. The available card sizes may depend on the capabilities of the ID card printer you are using.
-
Software Settings:
Within the ID card maker software, you can specify the card dimensions before designing the ID cards. The software allows you to input the desired width and height for the ID cards based on the selected size. These settings ensure that the design elements and text fit within the designated card dimensions.
-
Template Adjustments:
If you are using pre-designed templates provided by the ID card maker software, you can often make adjustments to the layout or scaling to accommodate different card sizes. The software may offer resizing or scaling options that allow you to maintain the design elements' proportions and optimize the card layout for different sizes.
-
Design Customization:
Whether you are using pre-designed templates or creating your own design from scratch, the ID card maker software enables you to customize the design elements to fit the selected card size. You can adjust the placement, size, and spacing of text, images, logos, or other visual elements to ensure they are visually appealing and readable on the ID cards.
-
Printer Compatibility:
It's important to ensure that your ID card printer supports the desired card size. The ID card maker software should be compatible with the specific printer model you are using or planning to use. The software communicates with the printer to ensure that the design is printed correctly on the chosen card size without any cropping or distortion.
-
Printing Process:
Once the design customization is complete, the ID card maker software instructs the ID card printer to print the ID cards according to the specified dimensions. The printer uses thermal or inkjet technology to print the design and encoded information onto the blank ID card stock in the chosen size.
Conclusion: By offering options to select card sizes, adjust templates, customize design elements, and ensure printer compatibility, a visitor ID card maker enables you to print visitor ID cards in different sizes. This flexibility allows you to meet your organization's specific requirements, adhere to existing card standards, or create ID cards that best suit your visual preferences and usability.
Print Visitor ID Cards in Color with a Visitor ID Card Maker
It is possible to print visitor ID cards in color with a visitor ID card maker. A visitor ID card maker is a device or software that allows you to design, create, and print ID cards for visitors. These ID cards typically include information such as the visitor's name, photo, organization, and any other relevant details.
To print visitor ID cards in color, you would need a visitor ID card maker that supports color printing capabilities. This can be either a dedicated ID card printer or a regular printer capable of printing in color.

-
Design the ID Card:
Using the visitor ID card maker software, you can create a custom design for the ID card. This typically involves selecting a template or starting from scratch and adding elements such as text fields, images, logos, and background colors.
-
Enter Visitor Details:
Once the design is ready, you can enter the visitor's details into the ID card maker software. This includes information like the visitor's name, title, organization, and any other necessary identification information.
-
Add a Photo:
Most ID card makers allow you to capture or upload a visitor's photo to be included on the ID card. The software usually provides editing tools to crop, resize, and adjust the photo for optimal printing.
-
Customize Card Elements:
Depending on the features of the ID card maker, you may have options to further customize the ID card, such as adding barcodes, QR codes, magnetic stripes, or other security features.
-
Preview and Finalize:
Before printing, you can preview the ID card to ensure all the information and design elements are accurate. Make any necessary adjustments or corrections.
-
Select color Printing:
If you're using a dedicated ID card printer, it would typically have color printing options built-in. You can select the desired color printing settings such as full-color or grayscale. If you're using a regular printer, ensure it is set to print in color mode.
-
Load Printing Materials:
For dedicated ID card printers, you would need to load printable ID card sheets or PVC cards into the printer's input tray. These printable cards usually have a specific size and thickness suitable for ID card printing. Regular printers may require standard-sized paper or cardstock.
-
Print the ID Cards:
Once all the settings are configured and materials are loaded, you can initiate the printing process. The ID card maker software will communicate with the printer and send the ID card design to be printed. The printer will then apply ink or toner to the printing materials, producing the ID card in color.
-
Cut and Distribute:
After printing, the ID cards may need to be cut to their final size if using printable card sheets. Some dedicated ID card printers may have a built-in cutter for this purpose. Once the cards are ready, they can be distributed to visitors to serve as their identification during their visit.
Conclusion: It's worth noting that the specific steps and features may vary depending on the visitor ID card maker software and printer you are using. However, the general process remains similar across different systems. Always refer to the user manual or instructions provided by the manufacturer for accurate guidance on using your specific ID card maker and printer.