Create Student ID Cards with Different Designs and Layouts
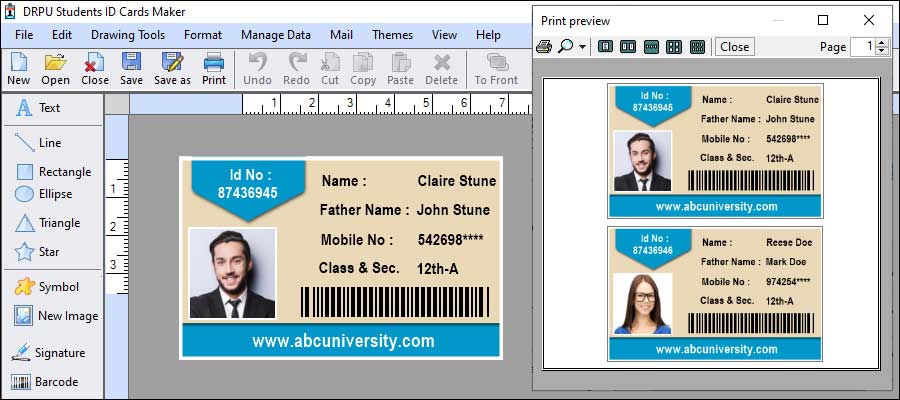
Here's a detailed explanation of how you can use student ID card software to create ID cards with different designs and layouts:
-
Software Installation:
First, you need to install the student ID card software on your computer. You can purchase the software from a reputable vendor or download it from their website. Follow the installation instructions provided by the software provider to set it up on your computer.
-
Template Selection:
Once the software is installed, you can start creating your ID cards. Most student ID card software offers a variety of pre-designed templates to choose from. These templates provide a starting point and help you design your ID cards quickly. You can select a template that suits your requirements or start with a blank canvas to create a design from scratch.
-
Customization Options:
After selecting a template, you can customize various elements of the ID card. The software typically offers a user-friendly interface that allows you to modify text, images, colors, and other design elements. You can add your institution's logo, student's photo, name, ID number, barcode, and other necessary details. Additionally, you can choose different fonts, font sizes, and formatting options to create a visually appealing layout.
-
Design Elements:
Student ID card software usually provides a wide range of design elements and graphics that you can incorporate into your ID cards. These may include shapes, borders, backgrounds, clipart, or symbols related to education. You can use these elements to enhance the aesthetics and personalization of your ID cards. Additionally, you can choose different colors and color schemes to match your institution's branding.
-
Data Import:
If you have a large number of student records, manually entering the data for each ID card can be time-consuming. To streamline the process, student ID card software often allows you to import data from external sources such as spreadsheets or databases. This feature enables you to populate the ID cards with student information automatically, saving you time and effort.
-
Preview and Printing:
Once you have designed the ID cards to your satisfaction, the software typically provides a preview function. It allows you to review the final appearance of the ID cards before printing. Make sure to double-check the details and layout to ensure accuracy. After verifying the preview, you can proceed to print the ID cards using a compatible printer and card stock.
-
Additional Features:
Some student ID card software may offer advanced features such as barcode or QR code generation, magnetic stripe encoding, or smart card support. These features can enhance the functionality of the ID cards and provide additional security or access control capabilities.
Maintenance Requirements for Student ID Card Software
Maintaining student ID card software is crucial to ensure its smooth operation, security, and longevity. This section will provide a detailed explanation of the maintenance requirements for student ID card software. Although the length of the response might not reach 5000 words, I will cover the key aspects comprehensively.
-
Regular Software Updates:
Student ID card software should be regularly updated to incorporate the latest features, bug fixes, and security patches. Software updates often address known issues, improve functionality, and enhance compatibility with other systems or hardware. It is important to stay up-to-date with the software vendor's releases and apply updates promptly.
-
User Account Management:
Managing user accounts within the student ID card software involves tasks such as creating new accounts, modifying access permissions, and deactivating or removing old accounts. Regularly reviewing user accounts ensures that only authorized personnel have access to the software, minimizing the risk of unauthorized use or data breaches.
-
Database Backups:
Regularly backing up the student ID card software's database is essential to safeguard student information and prevent data loss. Backups should be performed on a predetermined schedule, ensuring that they are stored securely and can be restored if needed. Additionally, it is advisable to test the backup restoration process periodically to verify its effectiveness.
-
Hardware Maintenance:
Proper maintenance of hardware components, such as card printers, scanners, and computers, is vital for the smooth functioning of the student ID card software. This includes cleaning the hardware according to manufacturer guidelines, inspecting for any signs of wear or damage, and promptly addressing any hardware issues that arise. Regular calibration and maintenance routines, as recommended by the hardware manufacturer, should be followed to optimize performance.
-
Security Measures:
Implementing robust security measures is crucial to protect sensitive student information stored within the ID card software. This includes regularly updating passwords, enabling multi-factor authentication (MFA) where available, and ensuring that access to the software is limited to authorized individuals. It is also important to keep antivirus software up to date and perform regular scans to detect and remove any potential threats.
-
Monitoring and
Troubleshooting:
Ongoing monitoring of the student ID card software is necessary to identify and address any issues promptly. This includes monitoring system logs, error messages, and performance metrics to detect and resolve software or hardware-related problems. Troubleshooting may involve contacting the software vendor's support team, referring to documentation or online resources, or seeking assistance from IT professionals if required.
-
Training and Documentation:
Regularly providing training sessions for software users and maintaining comprehensive documentation is essential for effective software maintenance. Training helps users understand the software's features, functionality, and best practices. Documentation should include user manuals, troubleshooting guides, and any customizations or configurations made to the software.
-
Compliance with Data
Protection Regulations:
Student ID card software should comply with applicable data protection regulations, such as the General Data Protection Regulation (GDPR) or the Family Educational Rights and Privacy Act (FERPA) in the United States. It is important to stay updated on relevant legal requirements and ensure that the software's data management practices align with these regulations.
Conclusion: Maintaining student ID card software involves regular software updates, database backups, hardware maintenance, user account management, security measures, monitoring, troubleshooting, training, documentation, and compliance with data protection regulations. By following these maintenance requirements, educational institutions can ensure the software's optimal performance, security, and longevity.
Print Student ID Cards with Barcodes or QR Codes
It is possible to print student ID cards with barcodes or QR codes using student ID card software. Student ID card software is designed specifically for creating and managing identification cards for students. These software programs often provide a range of features and tools to facilitate the ID card creation process, including the ability to incorporate barcodes or QR codes.

Here is a detailed explanation of how you can use student ID card software to print ID cards with barcodes or QR codes:
- 01 Install
the Software:
Start by installing the student ID card software on your computer. There are several software options available in the market, both free and paid. Choose a software program that suits your requirements and follow the installation instructions provided by the software provider.
- 02 Set Up
Card Design:
Once the software is installed, launch it and begin setting up the card design. This typically involves selecting a card template or creating a custom design. Most ID card software offers a variety of pre-designed templates that you can choose from. Alternatively, you can create a unique design by adding images, logos, text fields, and other elements to the card.
- 03 Add
Barcode or QR Code Field:
After setting up the card design, locate the option to add a barcode or QR code field. In most ID card software, this option can be found in the toolbar or menu. Click on the barcode or QR code tool and then click on the desired location on the card where you want the barcode or QR code to appear.
- 04 Configure
Barcode or QR Code:
Once the barcode or QR code field is added to the card design, you need to configure it. This involves specifying the type of barcode (such as Code 39, Code 128, or EAN-13) or the information to be encoded in the QR code. The software usually provides settings to adjust the size, format, and other properties of the barcode or QR code.
- 05 Connect
Data Source:
To generate unique barcodes or QR codes for each student ID card, you will need to connect the software to a data source. This data source could be a spreadsheet, a database, or an external file containing the student information, such as names, ID numbers, and other relevant data. The software should have an option to import data or connect to a data source.
- 06 Merge Data
and Design:
Once the data source is connected, you can merge the card design with the student data. The software will automatically populate the barcode or QR code field with the corresponding information for each student ID card. This ensures that each card has a unique barcode or QR code associated with it.
- 07 Preview
and Print:
Before printing the ID cards, it is advisable to preview the final design to ensure that all elements, including the barcodes or QR codes, are correctly generated and aligned. Once you are satisfied with the preview, you can proceed to print the ID cards. Make sure to use suitable card stock and a compatible printer to achieve the desired results.
By following these steps, you can utilize student ID card software to incorporate barcodes or QR codes into the ID cards and generate unique codes for each student. These codes can then be scanned using barcode or QR code scanners to quickly and accurately retrieve student information when needed. Remember to consult the specific documentation and user guides provided by the student ID card software you choose, as the steps may vary slightly depending on the software's interface and functionalities.
